USER INTERFACE
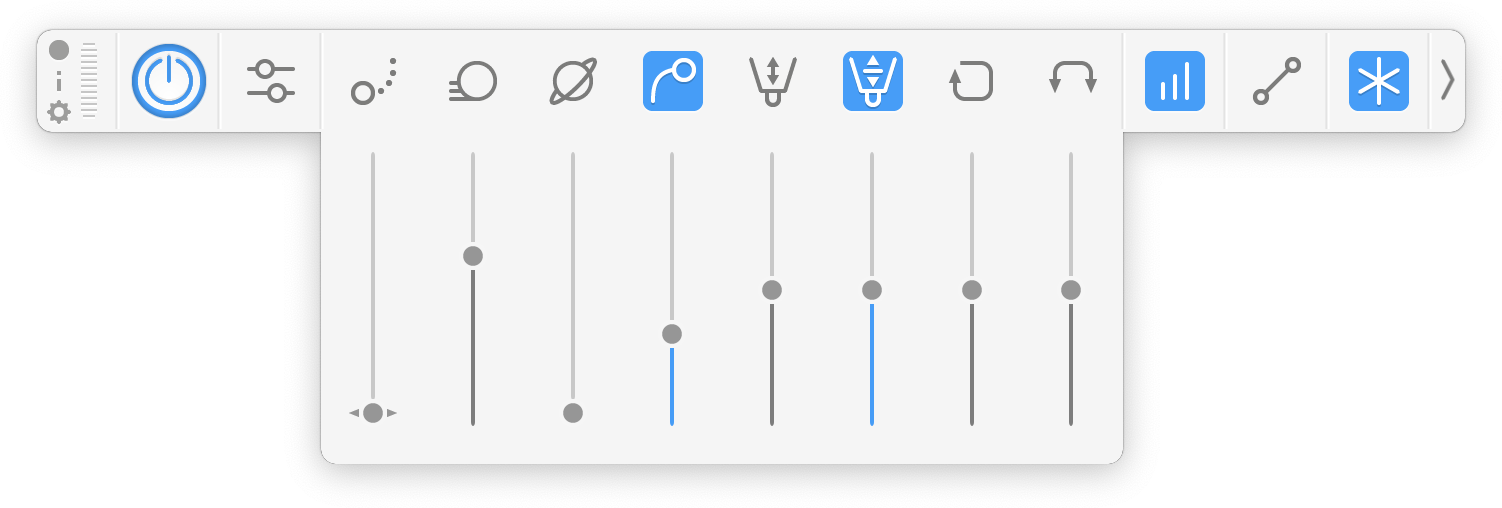
This is the main view of Hej Stylus!’ user interface.
The UI has three Sections:

・CORE FUNCTIONS
・SMOOTHING ALGOS
・TOOLS SECTION
CORE FUNCTIONS

- Close Quit Button

- User Guide

- Preferences

- Handle Bar – Click+Drag to Move, Doubleclick to send Hej Stylus! to the dock.

- Main Power Button – click to activtate any of the following functions

- Presets – click to open panel - drag panel to undock

- Presets Panel
- click on a preset to activate
- drag a preset to reorder
- doubleclick on a preset to rename it
- click on the X to delete a preset
functions: load, save, make new preset
SMOOTHING ALGOS

- Position Pull – adds an offset to your cursor position / smoothes out position

- Physics – adds a spring like follow up to your cursor position (fast)

- Space Constant – adds gravity swing to your cursor

- Fluid Position – the allround smoothing (slower) works together with pull and physics

- Fluid Pressure – good for building-up strokes / thick end

- Pressure Buffer – fine tips on both ends

- Fluid Rotation – smoothes rotation same algo as the other fluid functions

- Fluid Tilt – smoothes pen tilt behavior
TOOLS SECTION
Pressure Mapping Panel
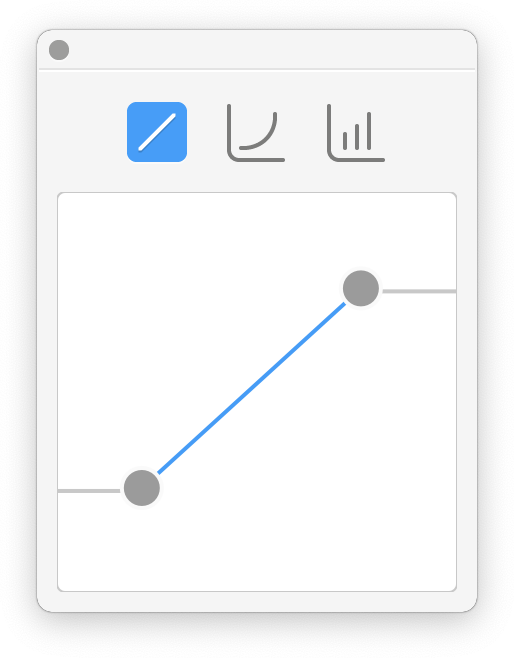
- Pressure Mapping Panel - Linear Mapping
- tap icon to activate / deactivate
- choose a mapping range
- bottom left = 0% Pressure
- top right = 100% Pressure

- Pressure Mapping Panel - Bezier Mapping
- tap icon to activate / deactivate
- choose a mapping range
- I = 0% Pressure
- II = 100% Pressure
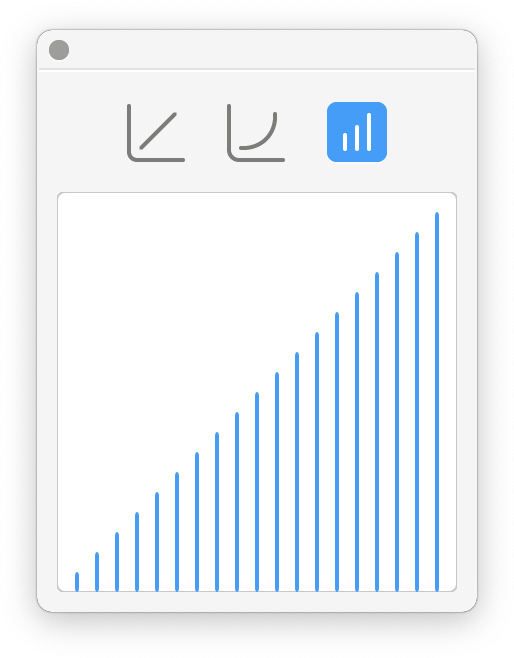
- Pressure Mapping Panel - Draw Mapping
- tap icon to activate / deactivate
- draw a mapping range
- bottom left = 0% Pressure
- top right = 100% Pressure
Ruler Panel

- Ruler Panel – Instant Ruler
- a ruled line plots instantly.

- Ruler Panel – Vanishing Point
- lock point by clicking on the canvas
- draw lines to / from / through the VP
- click or drag point to reposition

-
Ruler Panel – Linear Ruler
- lock 2 points by clicking or by drawing/dragging
- drag center third to move ruler
- click or drag modifier points to reposition endpoints
- doubleclick modifier points to reset ruler

-
Ruler Panel - Bendy Ruler
- lock 2 points by clicking or by drawing/dragging
- click again to set curvature
- drag center third to move ruler
- click or drag modifier points to reposition endpoints / curvature
- CMD + drag curvature modifier to tweak curve
- doubleclick modifier points to reset ruler

-
Ruler Panel - Circular Ruler
- lock 2 points by clicking or by drawing/dragging
- hold SP∆CE whilst placing the circle by draw/dragging to shift the construct
- drag / click on center point to move ruler
- SHIFT + drag center point to move ruler according to its X and Y axis
- SHIFT + drag outer modifier points to get 1:1 ratio
- SP∆CE + drag to shift the construct
- doubleclick outer modifier points to reset to 1:1 ratio
- doubleclick center point to reset ruler
Precise Angles Panel

- Perspective Panel - ISO / Precise Angles
Activate the precise angles panel by clicking the icon on top of the panel.
Next comes the visual indication of all the set angles.
The little icons below represent commonly used angle
setups to draw in: 90°,45°, 60°, 30°, 15° and 75°.
These shorthands are built in -
you can use the presets panel to store your own presets.
The next part of the panel is for entering the angles manually
(you can get very specific here).
Set a checkmark and enter a value to activate the angle.
Magnetiser Slider
Pull the slider to the far right to only draw with the set angles.
The less influence of the magnet the more you can ‘drift’ off the set angles.
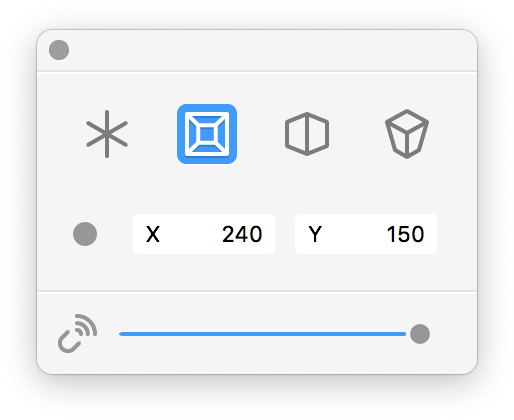
- Perspective Panel - One Vanishing Point Perspective
- click on canvas to set VP
- now draw horizontal, vertical and towards / away from VP
- click / drag on VP to reposition
- click / drag with SHIFT or CMD on VP to reposition x2 or x4
Panel functions
- hover over the VP representation to highlight position
- click on the VP representation to pick up / reset point
- Screen center equals 0/0
- drag L/R in the number box to set X/Y position (SHIFT or CMD also works here)
- double click to enter numeric value - confirm with enter
Setting VPs off Screen
- VPs can be set off screen - a little triangular indicator points at it
- click at indicator to reset VP
Magnetiser Slider
Pull the slider to the far right to only draw with the set angles.
The less influence of the magnet the more you can ‘drift’ off the set angles.

- Perspective Panel - Two Point Perspective
- click on canvas to set VPs
- now draw vertical and towards / away from VPs
- click / drag on VPs to reposition
- click / drag with SHIFT or CMD on VP to reposition x2 or x4
Panel functions
- hover over the VP representation to highlight position
- click on the VP representation to pick up / reset point
- Screen center equals 0/0
- drag L/R in the number box to set X/Y position (SHIFT or CMD also works here)
- double click to enter numeric value - confirm with enter
Setting VPs off Screen
- VPs can be set off screen - a little triangular indicator points at it
- click at indicator to reset VP
Magnetiser Slider
Pull the slider to the far right to only draw with the set angles.
The less influence of the magnet the more you can ‘drift’ off the set angles.
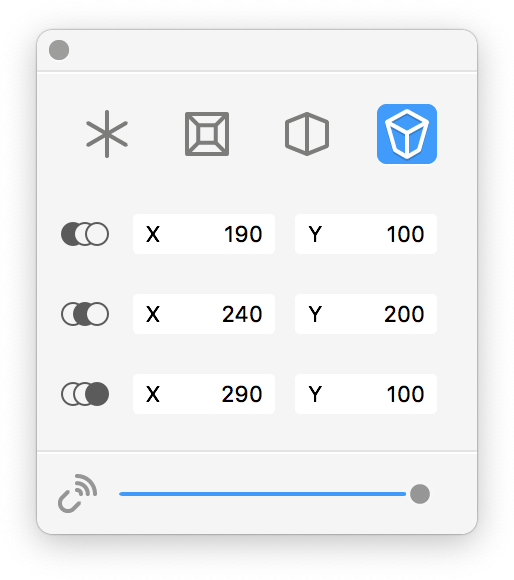
- Perspective Panel - Three Point Perspective
- click on canvas to set VPs
- now draw vertical and towards / away from VPs
- click / drag on VPs to reposition
- click / drag with SHIFT or CMD on VP to reposition x2 or x4
Panel functions
- hover over the VP representation to highlight position
- click on the VP representation to pick up / reset point
- Screen center equals 0/0
- drag L/R in the number box to set X/Y position (SHIFT or CMD also works here)
- double click to enter numeric value - confirm with enter
Setting VPs off Screen
- VPs can be set off screen - a little triangular indicator points at it
- click at indicator to reset VP
Magnetiser Slider
Pull the slider to the far right to only draw with the set angles.
The less influence of the magnet the more you can ‘drift’ off the set angles.